
Spring has sprung. And besides the lovefest that is Valentine’s Day, this may be one of your few opportunities to get crafty in the early part of the year.
If you are one of the over 150 million monthly Pinterest users, then you may be familiar with a little thing called “Penvy.” This word that we totally made up describes a common Pinterest phenomenon: Pinning to your boards like crazy without any intention of making anything. Ultimately, this frantic pinning coupled with lack of action leads to a knee-jerk jealousy any time one of your friends posts their latest project to social media.
Penvy can be a real bear, but we have a simple solution to this commonplace, Pinterest-induced envy. Set aside a few minutes for yourself. Pour a cup of coffee or a glass of wine. And make a nice craft. As simple as it sounds, we promise that starting a project and bringing it to completion is going to make you feel a whole lot better. It may even boost your confidence and make you give a generous “like” whenever your super-crafty friend circulates her next project on Facebook. (Though your mileage may vary.)
How much do you know about your mortgage? Here’s a quick glossary of mortgage terms that’s worth checking out.
At the very least, you’re going to have some fun if you use your hands and make something you can be proud of. If you have kids, this is the kind of DIY craft where they can join in on the fun. If you prefer to go it alone and save all the credit for yourself, we’re on board with that too. All you have to do is gather your supplies, grab your scissors, and get started. This is a springtime DIY project that you can tackle from start to finish in about 10 minutes.
DIY bunny art supplies
- Scissors
- Hot glue gun
- 1 page card stock, in color of your choice
- Frame, in color of your choice
- Old children’s book
- 1 white pom or cotton ball
When you’re ready to buy a new home, we’d love to help. Contact one of our loan officers to get the party started.
DIY bunny art tutorial
This easy-peasy project is a fun one because it has that vintage appeal, coming straight from the pages of an old children’s book. While it hurts our hearts to ever cut up the pages of a good book, we suggest using an old book you were planning to give to Goodwill or a favorite children’s book you’ve purchased a second copy of. That personal touch is going to make this sweet little project all the more meaningful.
Get started
Here’s where to begin:
1. Assemble your supplies.

Image: Bethany Ramos
You probably have most of these supplies lying around the house, which is a great thing. You can find card stock, a frame, and cotton balls at your local grocery or craft store.
Next
2. Start cutting.

Image: Bethany Ramos
Cut four different shapes from the pages of your old children’s book: a large circle for the body, a smaller circle for the head, and two ears. For those who don’t have the steadiest hand, try using different sized cans to measure out the circles before cutting. Don’t forget to trim the bottom off the largest circle so that it has a globe-like shape.
Next
3. Start gluing.

Image: Bethany Ramos
Now the fun begins! Rev up your hot glue gun and glue the circles and ears in place in the center of your card stock. (Practice where you’ll place these pieces since we all know hot glue isn’t so forgiving.)
Next
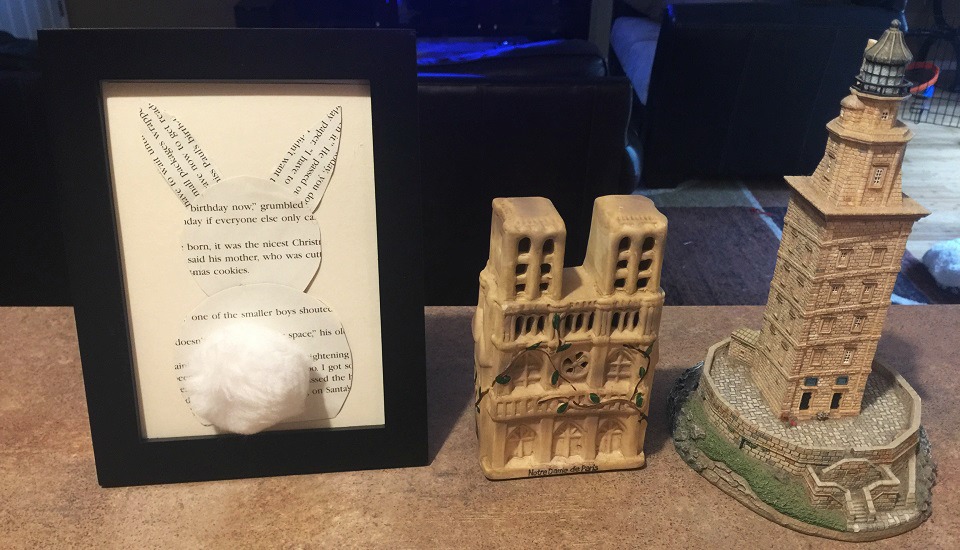
4. Glue on the tail and frame it.

Image: Bethany Ramos
Wrapping up your project with a bang, use the hot glue gun to glue the bunny tail in the center of the largest circle, a.k.a. the “bunny butt.” Give yourself a pat on the back for a job well done, and place your completed project in a frame. As a note, you may need to measure and cut down your card stock, depending on the size of your frame.
Next
5. Brag about your handiwork.

Image: Bethany Ramos
It doesn’t count if you don’t post it to Facebook or Instagram, right? Slap a filter on it and post your finished project to your social media channel of choice to prove to your friends and family that you really are craftier than they think. For those who already have their Pinterest game on point, make sure to add this cute little project to your crafting album on Facebook. We think you did an awesome job, and we know your friends will too.
When you’re done crafting, you can crunch some numbers. Use our helpful calculator to find out when you’ll reach mortgage payoff.
Looking for more craft-spiration? Follow us on Facebook, Twitter, Instagram, and Pinterest to get more DIY ideas for homeowners, plus “in the know” mortgage tips from our loan officers. One craft project at a time, we’re here to make your house a home.
For educational purposes only. Please contact your qualified professional for specific guidance.
Sources are deemed reliable but not guaranteed.