
It’s entirely possible that, with Mother’s Day right around the corner, you may have forgotten to make reservations at your favorite brunch spot and buying the perfect gift could have totally slipped your mind.
Perhaps the biggest advantage of taking on a DIY Mother’s Day gift is the amount of thought involved. The mother in your life is going to know you put effort into making her feel special when you present her with this treat-filled goodie jar on Mother’s Day. The fact that this DIY project is super simple doesn’t hurt. What we appreciate most about this DIY gift is that it can fall into the “budget” category. You can spend as much or as little as you like. You may already have a Mason jar or pickle jar in the recycling bin at your house (free!) that you can fill up with $10, $20, or $40 worth of goodies.
The point is to keep it personal with the personality and preferences of the gift recipient in mind. According to last year’s Today Parents Mother’s Day survey, it really is the thought that counts. Sixty-four percent of the moms who voted online said that they would rather receive an adorable, handmade card from their child over a professional massage or makeover at 36 percent.
You may want to refinance your home loan for the purpose of debt consolidation, home renovations, or to shorten or lengthen your loan term. Find out more here.
DIY Mother’s Day jar supplies
- Large Mason jar or empty pickle jar
- Assorted small treats that can fit in the jar (nail polish, lipstick, beauty samples, candy, etc.)
- Tissue paper or shredded filler paper
- Bonus: A drawing from or picture of your child
Is it a better idea to rent or buy? Use our helpful calculator to get a clearer financial picture.
DIY Mother’s Day jar tutorial
Take a quick trip to the store to fill up your basket with small, travel-sized treats, and then rally your kids to start putting this project together. This simple goodie jar can work well as a personalized and even last-minute Mother’s Day gift for mothers, stepmothers, grandmothers, aunts, and any other special women in your life.
Here’s where to begin:
Get started
1. Choose your jar size based on the amount of goodies you bought.

Image: Bethany Ramos
Next
2. Gather your treats and tissue/shredded paper to fill the jar. (We used nail polish, lipstick, coffee, chocolate, a bath soak, a candle, and more.)

Image: Bethany Ramos
Next
3. Add the first layer of tissue paper or shredded paper to the bottom of the jar.

Image: Bethany Ramos
Next
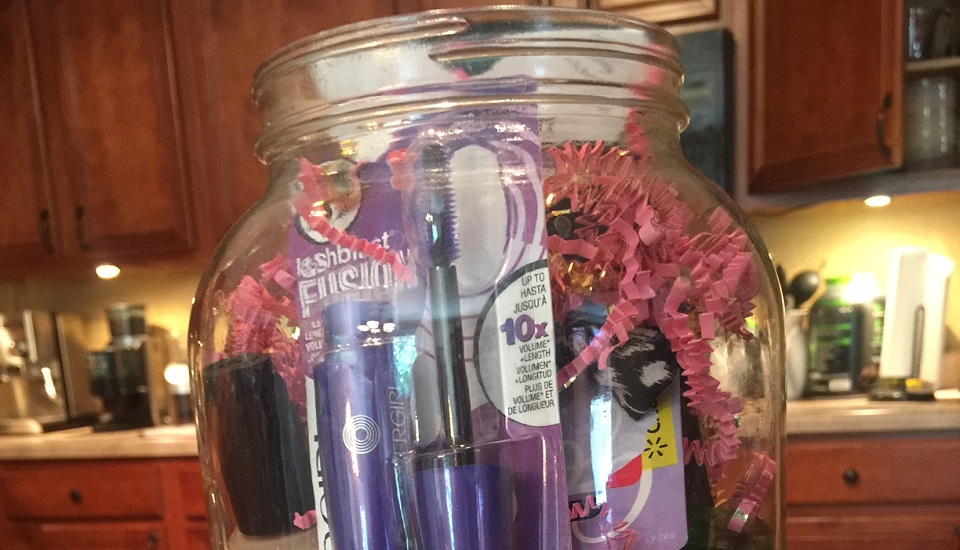
4. Place 3-4 treats on top.

Image: Bethany Ramos
Next
5. Continue to layer shredded paper and treats until the jar is full.

Image: Bethany Ramos
Next
6. Check your final product to make sure that most treats are visible and facing out.

Image: Bethany Ramos
Next
When you know, you know. If you’re ready to buy a house, we can help you get prequalified online.
7. For a special touch, don’t forget to include a drawing or picture of your child.

Image: Bethany Ramos
Next
8. Leave the goodie jar for Mom to find, or better yet, bring it to her with breakfast in bed.

Image: Bethany Ramos
Fun holiday craft tutorials are our specialty. You can follow us on Facebook, Twitter, Instagram, and Pinterest to get more DIY and home decor ideas, along with helpful home buying guidance from our mortgage professionals and the realtors in our network. We’re here to help you buy, organize, decorate, and enjoy the home you’re in.
For educational purposes only. Please contact your qualified professional for specific guidance.
Sources are deemed reliable but not guaranteed.
You’re receiving this resource from your loan officer, who operates within the lending division of Cornerstone Capital Bank, a full-service financing institution.
Cornerstone Capital Bank is the parent organization that brings together multiple affiliated lending teams, providing shared resources, solutions, and long‑term support to help clients make confident financial decisions now and in the future.